ارتباط بین جداول
ارتباط بین جداول در Crytal Reports
برای ساخت گزارش های حرفه ای در اغلب مواقع، به بیش از یک جدول نیاز است که توسط یک فیلد مشترک به یکدیگر لینک می شوند.
برای لینک کردن جداول، از ابزار Databas Expert، استفاده می شود.
جهت آشنایی بهتر، مراحل ایجاد گزارش لیست موجودی را بررسی می نماییم. (برای ایجاد چینین گزارشی، نیاز به انتخاب 3 جداول از پایگاه داده Xtreme.mdb و سپس لینک کردن فیلدهای مشترک در این جداول است.)
گزارش لیست موجودی
1- بعد از اجرای Crystal Report، یک گزارش خالی (Blank Report) ایجاد کنید.
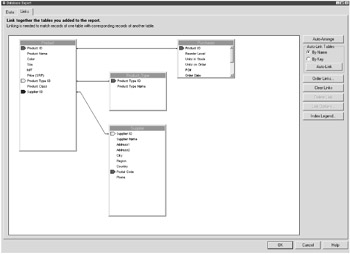
2- به پایگاه داده Xtreme.mdb متصل شده و جداول Product و Product_Type و Supplier را به پنجره Selected Table اضافه نمایید.
اگر بیش از یک جدول به لیست Availble List اضافه کنید، برگه Link، بالای پنجره ظاهر می شود و به شما اجازه می دهد تا بین جداول، لینک برقرار نمایید.
3- برگه Links را انتخاب نمایید.
به صورت پیشفرض، Crystal Reports بین فیلدهایی که نام مشابه دارند، لینک ایجاد می کند. این پردازش به Smart Linking معروف است.
خصوصیت Smart Linking براساس معیارهای زیر، فیلدها را انتخاب می کند:
- نام فیلد، مشابه باشد.
- نوع فیلد، یکسان باشد.
- طول فیلد، مشابه باشد.
توجه: این خصوصیت، ابزار مفیدی است، اما توجه داشته باشید که باید در نهایت، همه چیز، دوباره چک شود.
4- روی دکمه OK کلیک نمایید.
حذف لینک ها
اگر به هر دلیلی، نمی خواهید Crystal Reports، جداول را به یکدیگر لینک کند، می توانید لینک ها را حذف نمایید.
حذف لینک بین جداول
1- منوی (Database=>Database Expert) را اجرا نمایید.
پنجره Database Expert ظاهر می شود.
2- در برگه Links روی دکمه Clear Links کلیک نمایید.(با این کار کلیه لینک ها، حذف می شود)
پیغام (?Are sure you want to remove all links) ظاهر می شود.
3- برای تأیید پیغام، روی دکمه Yes کلیک نمایید.
مطابق شکل زیر، تمام لینک ها، حذف می شود.
البته Crystal Reports، به شما اجازه می دهد، لینک ها را یکی یکی حذف کنید. برای این منظور، مراحل زیر را طی نمایید:
1- جهت برقراری مجدد لینک ها، روی دکمه Links کلیک نمایید.
2-لینکی را که می خواهید حذف شود انتخاب نمایید.
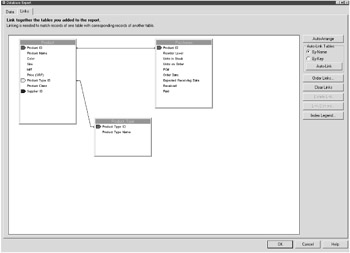
به عنوان مثال لینکی که بین جدول Product و Supplier است را انتخاب کنید. توجه داشته باشید که بعد از انتخاب لینک، دکمه Delete Link فعال می شود.
3- روی دکمه Delete Link کلیک نمایید.
خواهید دید که لینک Suplier ID حذف می شود.
اضافه کردن لینک
زمانی خصوصیت Smart Linking مفید است که، بتوانیم به صورت دستی نیز، لینک ها را اضافه یا حذف کنیم.
اضافه کردن لینک ها، به همان آسانی حذف آنهاست.
اضافه کردن لینک Supplier ID
1- منوی (Database=>Database Expert) را اجرا نمایید.
پنجره Database Expert ظاهر می شود.
2- در برگه Links، روی فیلد Supplier ID از جدول Product کلیک کنید و آنرا به سمت فیلد همنام در جدول Supplier بکشید و رها کنید.
مطابق شکل زیر، یک لینک جدید ایجاد می شود.
آشنایی با پنجره Link Option
از طریق این پنجره، می توانید نوع لینک و نوع join بین جداول را مشخص نمایید.
برای دسترسی به پنجره Link Option مراحل زیر را طی نمایید:
Link Option
1- منوی (Database=>Database Expert) را اجرا نمایید.
پنجره Database Expert ظاهر می شود.
2- در برگه Links، یکی از لینک های بین دو جدول را انتخاب کنید.
به عنوان مثال، لینک بین دو فیلد Supplier ID را انتخاب کنید. توجه داشته باشید که دکمه Link Options فعال می شود.
3- روی دکمه Link Options کلیک نمایید.
پنجره Link Options مطابق شکل زیر، نمایان می شود.
در پنجره Link Options چهار ناحیه به شرح زیر وجود دارد:
- Supplier.Supplier ID --> Product.Supplier ID: این ناحیه، فیلدهای دو جدول لینک شده را نشان می دهد. فیلد سمت چپ، منبع اصلی و فیلد سمت راست، کلید خارجی است.
- Join Type: نوع ارتباط بین دو جدول (Join) را نشان می هد.
- Enforce Join: زمانی که در حال join زدن هستید، استفاده از جداول را اجبار می کند.
- Link Type: به شما اجاره می دهد تا رکوردها را فیلتر نمایید. (به جدول زیر مراجعه کنید)
| نوع لینک | علامت اختصاری |
|---|---|
|
Equal |
= |
|
Greater Than |
> |
|
Greater Than or Equal |
>= |
|
Less Than |
< |
|
Less Than or Equal |
<= |
|
Not Equal |
!= |
- نوشته شده توسط امیر پهلوان صادق
- بازدید: 9753